
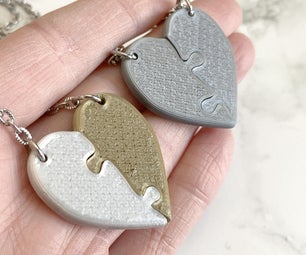
Introduction: Miniature Terrarium Resin Pendant


This was my first experiment with resin. And since I have quite a lot of experience with polymer clay, it just made sense to combine the two. The clear resin allows you to see the polymer clay nature scene, while also adding sturdiness to it, which allows you to make very delicate and small details that otherwise would just break off. I don’t know if the photos really show just how small everything is most details had to be placed using a needle. I’m really proud of how this one turned out and will likely be making more.
Supplies

· Polymer clay (mostly earth and green tones)
· Silicone resin pendant molds
· Clear epoxy resin
· Barbeque lighter
· Flat straight polymer clay blade
· Needle or toothpick
· Parchment paper
· Single use mixing cups
Step 1:


Mix up multiple earth tones of polymer clay. Roll them out into sheets and stack them together. Crumple the stack a bit to ad waves and visual interest. With your fingers shape the clay block into a shape that matches the bottom of your chosen pendant mold. Push the clay into any corners or gaps. Using a cutting blade cut the clay along the top of the mold removing the excess and revealing the marble effect.
Step 2:


Mix up multiple green tones of polymer clay. Roll out tiny sausages of the different hues of green (the thickness should mach the depth of your mold) and stick them on top of the “ground” you made in the previous step. Use a pin or needle and a flicking motion to texture the green clay to look like grass/moss.
Step 3:


Form tiny, elongated pieces from green clay, then stick them together at the bottom to make plants. For the mushrooms make a tiny white sausage shape for the stem and a flat rounded colour shape for the top. For the Amanita mushroom I also added tiny white dots using a needle. You can also experiment with different motives such as stones crystals or flowers. To place the decorations, use a needle. Pick up the decorations by the bottom carefully place them on the “moss”, position until you like the placement and then using the needle stick the decoration to the “moss”.
Step 4:


Flip the mold with the polymer clay sculpture on a piece of parchment paper and carefully remove the silicone mold without distorting the clay. Bake the polymer clay according to package instructions (I used Fimo Soft and baked 30 min at 110°C).
Step 5:


Make sure the molds are clean and have no leftover dust. Mix the resin and hardener according to package instructions. Use a barbeque lighter to remove bubbles. Dip the polymer clay inlay into the resin and then place it in the pendant mold face down. Fill the remaining mold with resin. Use a pin or toothpick to bring up any bubbles stuck at the bottom of the mold. Then run a barbeque lighter across the surface of the resin to pop the bubbles. Allow the resin to set for at least 24 hours. Finally, demold the pendant. Wear it as a necklace or add a clasp to make it into a key chain.

This is an entry in the
Big and Small Contest


14 Comments
10 days ago
This is awesome!
Reply 7 days ago
Thank you 💚
11 days ago
Spectacular :)
Reply 11 days ago
Thank you so much 💙
15 days ago on Introduction
These are wonderful. You have my vote! Thank you for the great instructions.
Reply 13 days ago
Thank you so much 💛
18 days ago
What about the hole? How do you plug it up so the resin doesn't spill through it?
Reply 13 days ago
Hi. If you look at the supply section image, you can see the molds I'm using. They already have a shape in them that forms the hole. You can easily buy them online, just look up "silicone resin pendant mold"
14 days ago
I love this. These would make some nice little Christmas ornaments too. I can see doing tiny Christmas scenes in these. Have you ever tried to remove the air bubbles using vacuum? I was thinking of using a glass jar, and setting the mold in it and then attach the vacuum sealer attachment for jars, and suck out every single air bubble, leaving a smooth surface. Keep up the great work.
Reply 13 days ago
Thank you 💙 from what I've read vacuum is probably the best way to remove bubbles. I don't have access to a vacuum sealer or any such thing, so I used the lighter method. For tiny resin objects the lighter does the job perfectly well though. For larger objects a vacuum would be preferred
15 days ago
What a cute idea! I already have the molds so I just need some clay.
Reply 14 days ago
Thanks 💜
19 days ago
This is so cute! I might try it, when I get more resin!
Reply 19 days ago
Thank you 💛 and happy crafting!