
Introduction: Quartz-movement Based Perpetual Calendar Clock


A clock with a perpetual calendar mechanism that correctly handles all types of months, including February in a leap year, has been developed. Despite the weak torque of a quartz clock movement, an improved mechanism has been designed to mechanically realize this complicated function.
Features
- The calendar advances automatically, so you do not need to adjust it until March 2100. In the morning at March 1st, 2100, this clock will show Feb. 29th. So please raise the main arm once and all set, if you will be still alive and remember it.
- It uses a commercial clock movement, so it can work for a long time without an external power supply.
- The calendar is easy to adjust by directly rotating the clock hands.
- The rear surface is flat, making it easy to hang on a wall beautifully.
- The skeleton design exposes the mechanism inside, making it easy to assemble.
- There are no visible screw heads on the front side.
- This clock is easy to print, as all parts can be printed without support structures.
- You can make this clock using popular 3D printers that can print objects up to 180mm x 180mm (use the square back plate and separate main arm).
Contrary to the former design with stepper motor, it uses not rubber bands but a weight and the gravity. Therefore, the calendar mechanism works only when the clock is upright on the wall.
Supplies

- "High torque type" quartz clock movement commonly sold in online stores such as amazon.com. It comes with a long minute hand which is attached to the shaft using a cap nut. I used this one.
- An assortment of 2mm tapping screws. It is also sold in online stores. This clock uses relatively short tapping screws.
- A M8 nut made of steel or stainless.
- Double sided adhesive tape.
Step 1: Modification of the Movement


- disassemble the movement and shorten the thread using hacksaw. Ideal length of the thread is around 5mm, because the thread to mount the movement to the clock face is usually too long.
- Shave the shaft for the hour hand to form two flat sides. It is necessary to engage the gear to the shaft securely .
- Make sure that the clock movement properly works after reassemble.
Step 2: Print and Assemble of the Base Unit


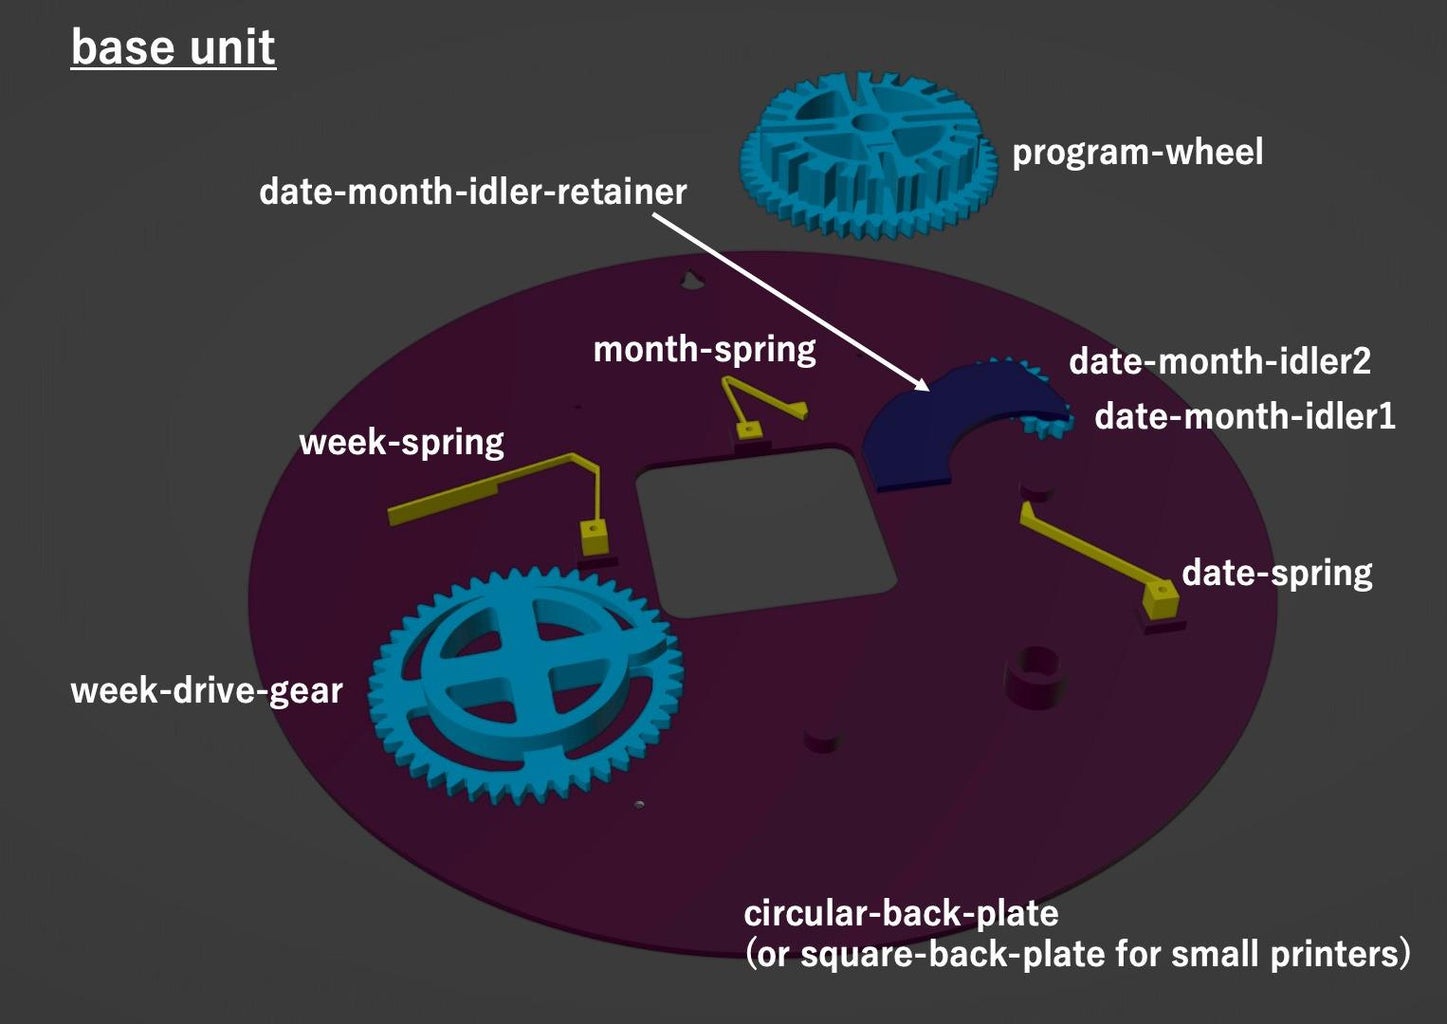

- Print the parts with supplied posture. No support structure needed.
- If your printer can not print the circular-back-plate.stl (diameter = 250mm), use "square-back-plate.stl" instead. It is within 180 x 180mm.
- Remove blob and debris on gears carefully. It is very important to make the clock driven by very weak torque.
- Assemble the parts using 2mm tapping screws. Please take a look at the assembly guide video. The parts list below is listed in a same order to the video.
Attachments


Step 3: Print and Assemble of Front Unit


- Print the parts with supplied posture. No support structure needed.
- Remove blob and debris on gears carefully. It is very important to make the clock driven by very weak torque.
- Assemble the parts using 2mm tapping screws. Please take a look at the assembly guide video. The parts list below is listed in a same order to the video.
- When you attach the "week-driven-gear.stl" to the "week-hand.stl", align the notch towards the hand.
- "month-gear.stl" is 90degree rotation symmetric (12 teeth) and you do not need to care about the direction.
Attachments


Step 4: Engagement of Two Units


- Print the parts with supplied posture. No support structure needed.
- main-arm.stl has a print-in-place hinge. It works well when the arm is installed in the clock that restricts the degrees of freedom. However, it may separate each other when moving part is twisted. It can be re-assembled by the manner of easy puzzle.
- If you use small printers with the build table of 180x180mm, print the main arm separately using “main-arm1.stl” and “main-arm2.stl”, then assemble it by twisting motion. The separate models would be useful if they fuses each other with print-in-place method.
- Stick M8 nut to the weight space of the main arm.
- Place the program wheel on the base plate.
- Engage the front and back unit each other.
- Align the angle of the month hand. Set the program wheel to February (main arm is inserted to the deepest part), then rotate the month hand to the desired angle.
- Align the angle of the "week-drive-gear.stl" so that the week hand rotates at midnight.
- Fix two units using 2mm tapping screws. Please take a look at the assembly guide video.
- Confirm that the calendar advancement mechanism is working properly.
Attachments


Step 5: Installation of the Quartz Movement


- Print the parts of minute and hour hands with supplied posture. No support structure needed.
- Attach the movement to the clock.
- Align the two hands of 12hours and 24hours when attaching the hour hand.
- Attach the minute hand using a cap nut comes with the clock movement.
- If the shaft of your clock movement is too short and the hands interfere each other, use "min-hand-for-shorter-shaft.stl" and/or "hour-hand-for-shorter-shaft.stl".
Attachments


Step 6: Stick the Clock Dials


- Print the parts of dials with supplied posture. No support structure needed.
- Select the month dial from two candidates.
- To give different color to the letters and indices, use "pause at height" function of your slicer, and change the material during the pause. Change the material at height=1.5mm.
- Stick sub dials to the front frame with double sided adhesive tape.
Dials in non-English languages are at https://www.thingiverse.com/thing:5986655 ,versions for the other languages would be added on request. Alphabetical characters only.

Step 7: Enjoy!

Confirm that the clock is working properly.
How to adjust the calendar
- The calendar can be advanced a day by raising the main arm (at the weight)
- The date hand can be rotated manually to quickly set the date. From 31st to 1st, the main arm should be retracted from the program wheel. It can be rotated clockwise only.
- The month hand can be rotated manually. The main arm should be retracted by raising the weight. It can be rotated to the both direction.
- The week hand can be rotated manually also. At midnight, the drive gear is engaged to the driven gear, so avoid operating it at midnight.
The calendar is updated around 22:00. If you want to change the time to update to around 0:00, use "24h-hand-30deg.stl" that has 30 degrees (= 2 hours) twisted hand.
Troubleshooting
- If the date advancement is not working properly (for example, it advances 2 steps per day), tune the length of the "date-spring.stl" by slightly scale up or down of this parts with your slicer.


This is an entry in the
Battery-Powered Contest


4 Comments
21 days ago
Fantastic! This is really awesome, and I can't wait to build one!
The only hitch is that it doesn't seem to have DST support. I'm wondering if it's possible to add in a manual slider that simply moves the hour hand forward/backward one hour to toggle DST on/off. I know it would be really complicated to factor in another mechanism to do automatically (though darned nifty to ponder how to do it).
If I can think of an especially elegant solution (especially one that can be added on to the original design retroactively), I'll try and share.
Again-- Very Nice Work! Kudos! 😊
22 days ago
Hi shiura
I think this is a great project. I particularly like the use of an separate weight to power the complications, with the quartz movement providing the precise timing. Ingenious. I've had a related project on the back burner for a decade but this might be the innovative step which finally makes it feasible.
Good work!
dr_phil
Reply 22 days ago
Thank you, it is my pleasure to hear that. One of my design policies is to prioritize reproducibility by other makers. From this perspective, weights are better than using metal wire springs because they are easier to prepare and adjust. I am looking forward to seeing your project soon!
22 days ago
This is great
I will be using the logic for my upcoming project