
Introduction: 3D Print Puzzle


I thought it would be fun to make some 3D printed puzzles and I started working on them way back in August 2020. After many, many tests and experiments (and too much procrastination), I'm finally happy enough with the results to share them! This tutorial will not only share the 3D puzzles I made, but will also share the process so you can make your own 3D printed puzzles of almost anything!
Instructable 352

You can buy my 3D printed Puzzles in my Etsy Store. And I'm open to suggestions if someone wants a custom design or something added to one of the current designs.
Supplies
- 3D design program - I'm using Tinkercad
- Illustrator-type program - I used Inkscape
- 3D Printer - I have a Prusa MK3 MMU2
- Filament of choice - I use a variety of PLAs - If you are curious about a specific color I used, just let me know
- Boxes 6x5x1 (optional) - I designed my puzzles to fit perfectly in these boxes but you can also just use them to store and organize them when you are done
- Colored Printer (optional) - I don't have a colored printer, but if you do, you can print off a picture of your design to put on the box
Any Amazon links are Amazon Associates links.
Step 1: Puzzle

Puzzle
Step 2: Design Puzzle - Base


You need a base for your puzzle.
The easiest thing to do is do a rectangle (and you can optionally curve the corners).
The Tinkercad shape Terrain is also a good option which I used for my Baby Yoda and Mandalorian puzzle.
Whatever you decide, I recommend the bottom be flat/smooth for ease putting it together, but that doesn't mean it can't have holes or anything. Have fun and experiment.
Step 3: Design Puzzle - Design


For my shapes puzzle, I originally just did raised simple shapes, but then realized I wasn't fully utilizing what a 3D printed puzzle could be. So, I ended up using a 3D heart, butterfly, star, and made a flower out of spheres.
Step 4: Generate Your Puzzle

Once you have your puzzle design and an idea of size, you can use a puzzle generator, I have come across two, but there are probably more out there:
Think about:
- How big you want the overall puzzle to be: I want mine to fit inside a box that is 6" by 5"
- How many pieces you want: I wanted to do a kids puzzle, so I didn't want too many pieces and I didn't want the pieces too small
- How big your printer bed is: I would say it's easiest to just do a puzzle that fits on your bed, but you COULD do it in sections if you want a large one
- If you are doing a multi-colored print: you will need room for a wipe tower
Step 5: Convert the Puzzle Design for Tinkercad (or Other Program)


Alright, here is the big, important part of this tutorial.
Now that you have your SVG, we need to make the lines a little bigger before bringing it into Tinkercad.
In its current state, if you bring it in, it will likely look something like the first photo above because the lines are too small for the program to handle, not only that, but the lines are going to be too thin to print. So, we need to use another program to do a little editing.
I am using Inkscape (Illustrator or another program should work as well) so these directions are specific to that program, but this should give you an idea.
Take the SVG and open it up.
- Make sure you have selected your puzzle object
- Click on the PATH menu at the top of the screen
- Change the line thickness/width to .15 mm
- Click Stroke to Path
- Double check to make sure it is no longer a line and is now a path
- Enlarge (optional) to make sure you get good curves when you import it (I've noticed in the past that when you bring rounded/curved objects into Tinkercad, the smaller they are the more likely the smooth curve is lost so I enlarge things and that preserves the curve) - also make note of the size BEFORE enlarging to make sure you can resize it correctly later
- Import into Tinkercad as large as you can (again for best detail)
- Shrink to the size you made note of earlier
Now you have your puzzle shape that you can cut your puzzle design with.
Step 6: Duplicate Puzzle Cutout and Group


Now that you have your design and your puzzle cutout, you are ready to make the puzzle.
Line everything up. If you are doing just one color, it's easy, just cut out the puzzle by grouping them together and you're done!
If you are doing multiple colors, duplicate your puzzle so you have more copies but they are in the exact same spot and then group the puzzle cutter with each color one by one until everything is cut.
Export your puzzle, or each color one by one when you are ready to slice and print.
Step 7: Slice


Time to slice! Here are some things to keep in mind depending on your slicer.
- Perimeters - the more detailed your puzzle and smaller the pieces, the harder it will be to get them to show, I recommend reducing to 1 perimeter if things aren't looking right
- First Layer / Elephant Foot - Prusa has a setting for Elephant Foot Compensation. The default is .2mm and this actually helps to ensure the first layer doesn't fuse together, so I recommend leaving this default or finding a way with your slier to reduce the amount of filament used on the first layer
- on the opposite side of this, if you end up with a blank puzzle piece for the first layer anywhere (which happened to me once) I found reducing the elephant foot compensation to .1mm fixed it
- Purging Volumes - for multi colored prints, if you are using very light and very dark colors, I recommend increasing the purge amount for loading a light color to make sure it purges the extruder enough, I tried to save filament once and lowered these and the gold star ended up with green in it
- Infill - I usually leave this as the default 15%, but for something that is see-through such as glow in the dark colors, I recommend increasing to 100% infill
Step 8: Puzzle Test Prints


Before you go ahead and waste time and filament on these puzzles, let's do some tests prints. I took the time to create a simple design that has puzzle line thicknesses ranging from .15mm to .25mm. The ideal is to get .15mm to work, but if not, you have backup options and the pieces will just fit a little looser together.
Test each corner and the center. See if you have any trouble spots. I recommend that you print the test at at least 1mm thick, but you can go up to a few millimeters depending on how thick your prints will be. 1mm is good as I feel the base of your puzzle should be at least that thick to get a sturdy but not too thick puzzle.
If you are doing a lot of tests, you can start with just .4mm (2 layers) and work your way up in thickness as you are dialing it in in certain areas.
Updates you might need to make:
- First Layer Calibration - make sure it isn't too close, you may have to just change the settings up when you do puzzle prints
- Bed Level Correction - I have this in the Prusa machine and I used it to try to fix the corner that wasn't working as well
- Elephant foot - change up the flow on the first layer if that is the only layer giving you trouble and don't let it extrude as much, slicers usually have you extrude more here to help it stick
- Use a thicker line - when it comes to making your puzzle cut design, just make the line thicker than .15mm if it won't work that small
- Just don't print there - it sucks, but if you are having trouble with just one corner and you can't get the overall print to work because of that corner, avoid it
- Check for debris - Make sure nothing is under your build plate if it's removable. Mine has a spring steel plate and I didn't realize it, but one time when I was having trouble, it was because there was just the thinnest piece of debris under the plate and it raised the bed enough in that spot to fuse all the pieces together there

Step 9: Print!


Now is the moment of truth!
It is time to print.
Keep an eye on the first layer. If it looks like all the pieces are fusing, I recommend just canceling and making corrections before printing again. If it fuses in just small parts, you'll be okay as they should snap apart later. But if the whole thing looks fused, they will not come apart and it will be a waste of time and filament.
Pay particular attention to any problem areas you've had during testing.
Once it's done, it's time to pop those pieces off! As I mentioned, a little fusing can be okay, you'll just have to break those pieces apart. Carefully bend them back and forth at the connection (last three images above) until they snap apart.
Step 10: Enjoy Your Puzzles!


My daughter seemed to have fun with these :)
Step 11: Baby Yoda / the Child / Grogu and the Mandalorian


Attachments


Step 12: Shapes


Attachments


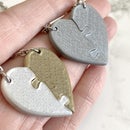
Step 13: Hearts


Attachments


Step 14: Other Designs


Just a look at some of the designs I've messed around with. I've done easy and harder ones. Mostly multi-colored ones, but there is one single color honeycomb one in there that I tried to spray paint rainbow. I also experimented with doing a different shape while having normal puzzle setup (with the car).


8 Comments
1 year ago
i dont understand ... its just puzzle pieces . What am i missing here ???
Reply 1 year ago
Yup, just puzzle pieces.
1 year ago
Hi, nice instructions and so cute tiny toys :) Congrats and thanks for sharing.
Reply 1 year ago
Thank you :)
1 year ago on Step 9
Hi,
Do I unterstand it correctly? When you print with 4 different colors you have to change filament 4 times for each layer?
Best Answer 1 year ago
Correct. I have a multi-media extruder so it will automatically change the filament, wipe the filament as it changes between colors, and start with the next color on that layer.
1 year ago
These are all so neat! I think I like the wild looking rainbow one the most. That looks really fun to do 😍
Reply 1 year ago
Thank you! My spray painting job wasn't the best but I thought it was fun :)