
Introduction: Using Loops in Tinkercad to Design a Bursting Star


This has been written by the Tinkercad team at Autodesk as a teacher-led resource to support the 'Hour of Code™'. The Hour of Code is a nationwide initiative by Computer Science Education Week [csedweek.org] and Code.org [code.org] to introduce millions of students to one hour of computer science and computer programming. The 2019 Computer Science Education Week will be December 9-15, but you can host an Hour of Code all year-round.
Recommended grades: 5-6
Skills taught:
- Explain how order and variety work together to achieve a pattern.
- Find patterns in code.
- Use loops instead of repeated code.
- Create a decorative design.
This lesson is aligned with the CSTA K-12 CS Standards and the ISTE Standards for Students.
CSTA Standards: 1B-AP-10 Create programs that include sequences, events, loops, and conditionals.
ISTE Standards: 4c - Students develop, test and refine prototypes as part of a cyclical design process. 5c - Students understand how automation works and use algorithmic thinking to develop a sequence of steps to create and test automated solutions. 5d - Students break problems into component parts, extract key information, and develop descriptive models to understand complex systems or facilitate problem-solving. 6b - Students create original works or responsibly repurpose or remix digital resources into new creations.
Other Subjects: Math, Geometry, and Design. Students will have exposure to turning by degrees. They'll also be exposed to 3D printing and computer-aided design (CAD).
Lesson overview: During this lesson, students will start by exploring how patterns are used in nature, biology, and sciences. In the process, they will use computational thinking to recognize patterns in their code, and use loops around those patterns to create something in Tinkercad.
Estimated Instruction time: 60 minutes
Materials: Computers, Internet, Tinkercad, (a free, easy-to-use, web-based 3D CAD design tool), teacher lesson plan and notes, slideshow for teachers.
Step 1: Setup Tinkercad for Your Classroom

As a teacher, you can set up your students in a virtual Tinkercad Classroom. This eliminates the need for students to setup their own accounts! And, it even lets you quickly review your student's designs.
With Tinkercad Classrooms, you can get your students started right away! They just need a Nickname selected by you and a Class Code.

How to get started: Setting up your classroom is easy! First be sure you've signed up as a teacher on the Teach page, then follow this quick guide to create your classroom and add your students.
Just to note, Students under 13 can create a personal Tinkercad account with approval from a parent/guardian or use Tinkercad in a Tinkercad classroom created by their teacher.
Step 2: 'Do Now'!
To get your students in the mindset of designing a shape, start them off with a 'Do Now' exercise.
Do now: Get students thinking about designs by showing off a design, and having them make their own designs.


Step 3: Build Context Around Coding

Things to explore before the Hour of Code
The inspiration behind Hour of Code is to "demystify" computer science, to show that anybody can learn the basics, and to broaden participation in the field of computer science.
Some educators choose to launch Hour of Code with their students by sharing a quick, inspirational video. Others front-load the hour by pre-teaching the context around coding during a lesson before the actual coding activity. Some schools or teams of teachers organize Hour of Code as a daylong (or even week-long!) interdisciplinary activity.
In launching this lesson, you might share this slide show, which includes images and definitions of key words like repetition, pattern, rhythm, loop, and variable within the context of science, math, humanities, and art.

Depending on your students' familiarity with the Cartesian coordinate system, it might make sense to review this too before launching into Codeblocks. Even if they have used a block-based coding program like Scratch before, the Z axis could be a new (and exciting!) concept for them to learn.
The most important part is that they share their computational thinking throughout the coding activity, and use this thinking as a way to extend their creativity through coding!
Begin with the familiar
Teaching students about patterns is inherently fun and accessible, because patterns are everywhere. They can be found in nature or can be made by humans. They can be seen in flower petals, on shower heads, and as decorations in the home.
Because of repetition, patterns are usually easy to identify, but making a pattern, or even describing how it is made, requires a much deeper level of thinking.
And patterns are created in different ways, for example, in nature, patterns are often formed as a result of stress; while in building architecture, a "pattern" (like doors or windows) commonly evolves from the way people move through an environment.
Sometimes designers use patterns that were inspired by nature--like the honeycomb pattern, which, in turn, originates in the habits of bees. More about this here!

Ready to start coding in CAD?
The next step launches into the coding part of this lesson. If you think you may need additional support in getting started with Tinkercad Codeblocks, skip down to the final step for some tips and more resources.
Even if you and your students only make it through the next step during the first hour, it's okay as long as everyone had fun and learned something new.
Step 4: Log Into Tinkercad and Introduce the Kind of Design That Will Be Created
Once they are logged in, they can choose Codeblocks from below their profile image on their main homepage. On the next screen, they should choose "New Design."
Log into Codeblocks!
 Are you completely new to Tinkercad Codeblocks? Check out this Quick Start Guide to learn everything you need to get your students started. We've also included more quick start information about Tinkercad in the final step of this project.
Step 5: Build Their First Tinkercad Shape
Once your students have logged in, they can start thinking about the designs they will make. Show them some pre-created designs. They should notice that the designs are made up of the same shape over and over.
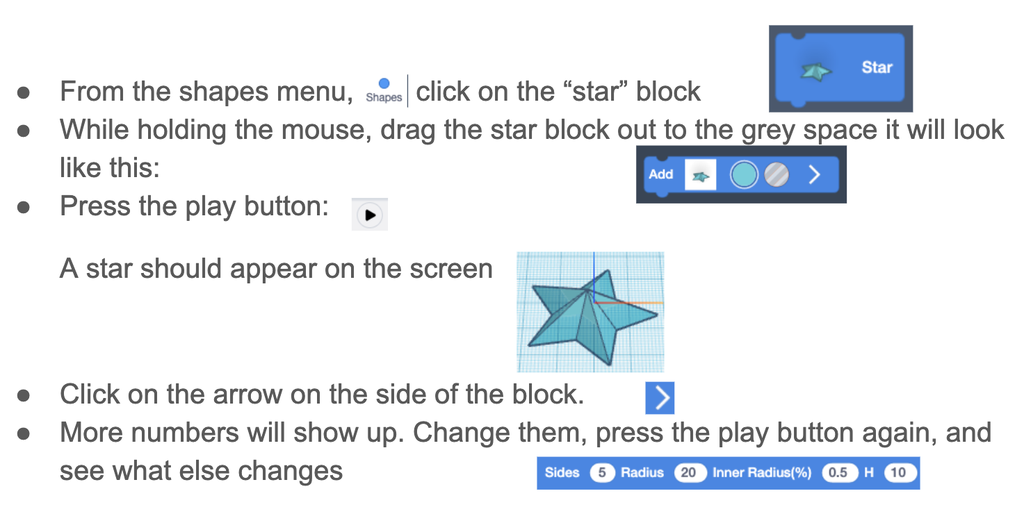
It’s time to learn how to make a shape in Tinkercad.
Demonstrate how to create their first shape, and what the varying numbers do, and let them explore the block.
This is how you grab a shape block:
Create a star
Step 6: Rotating Shape Blocks
The decorations are made of the same shape rotated a few times. It’s now time to learn how to rotate shapes! Demonstrate for the class, then let them try it for themselves.
Turning shapes in Codeblocks

Step 7: Grouping Shape Blocks
It’s going to be important to make the whole group of shapes turn the same amount at the same time. To do that, you need to use the “Select all in object” block.
"Select ALL"

Step 8: Adding a Loop
There are a lot of constructs in Computer Science that make it easier to write code in a shorter amount of time, to use patterns to the programmers advantage. One of these constructs is known as a loop. In Tinkercad codeblocks, we’ll use the repeat block as our loop.
Show the students the long, 24 block code. In this 24 blocks of code, the same 3 blocks the students have already learned repeat 8 times. Help them find that pattern.
Patterns
Do you see a pattern in this code?
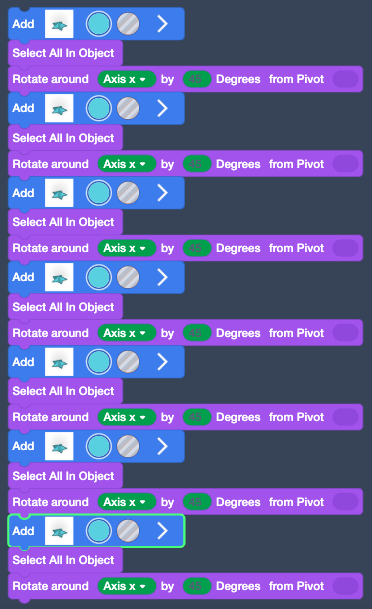
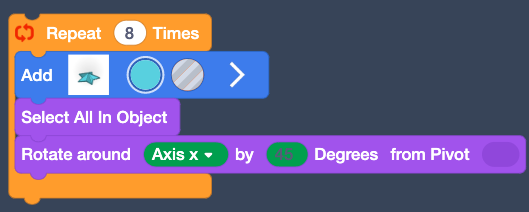
Show the students what code looks like without a loop (24 blocks long) and what it looks like with a loop (4 blocks long). This is the power of repeat loops. The code is easier to read and shorter to create, yet it does the exact same thing.
Loops
Look at these two versions of code. They do the same thing!
Which one would you rather write?
Loops

Step 9: Let Your Students Explore!
Finally, your students have all the skills they need to create their own bursting star decorations. Have them explore different points on the star, different repetitions, different degrees, using different shapes. Let them make their bursting star designs their own.
Students who want to extend the project further with blocks you haven’t explicitly taught can do things like:
- Add another shape to the rotation.
- Try introducing a “Move” block in between turns and making a spiral,
Create Your Own Design!
Play with different shapes!
Play with different degrees and repetitions
- If you want to make a full star, try 5 repeats of 36 degrees, or 4 repeats of 45 degrees.

Step 10: Create a GIF

Are your students in love with their bursting stars? With just a tad more technological magic, you can help them bring their designs to life.
For near-instant gratification, your students could make GIF recordings of their Code-CAD creations. This can be done inside the Tinkercad Codeblocks editor by hitting the Share button and then choosing to "Save Gif" in the next screen. Make sure you run it first in the editor. (Note: It takes a few minutes for your GIF to package and download. Totally worth the wait!.
As their proud teacher, you might also ask permission to share some of their work yourself - in the spirit of "demystifying coding." (If you post on social channels, please tag us @tinkercad and include the #HourOfCode or #CSEdWeek hashtags)
Step 11: Gallery Walk
When there are approximately 10 minutes left of class time, it’s time to celebrate your students’ hard work and creativity. First, let them show off their work with a gallery walk.
Let your students know it is ok if they are not done; this is a celebration of what they have so far.
Students should leave their computers open, with their designs on them. All students should start walking around the class, holding post-it notes and pencils. Students should leave at least one comment on each project they pass.
Have a conversation with students about useful feedback. Ask them what kinds of comments they think are kind, what kinds of comments they would like to receive on their own work, etc. From there, build guidelines around what they should say to each other.
After the students have done their gallery walk, give them some time to read their feedback, and then reflect as a class on how feedback felt.
Gallery Walk
- Walk silently around the classroom, looking at people’s projects.
- Look at the image your classmate created.
- Leave one “Glow” (a thing you like).
- Leave one “Grow” (a thing you think could improve)
Ask your students: How did the feedback you got feel?
Step 12: Celebrate!
Congratulations! You and your students have taken a journey into 3D modeling, design, and code! Now that your students are done, we encourage you to celebrate with them by printing an official Hour of Code certificate. Send your students here to print a custom certificate.

The 'Hour of Code™' is a nationwide initiative by Computer Science Education Week and Code.org to introduce millions of students to one hour of computer science and computer programming.
You can also download a congratulations certificate from Autodesk® Tinkercad™ to celebrate your student's success!

Step 13: Appendix | Getting Started With Tinkercad Codeblocks
If this is your first time teaching a project that integrates CAD and code, here are a few helpful hints to get you started:
- Visit the Tinkercad Codeblocks page
- Read this blog post: CAD and Code, Together at Last
- Explore the starter Codeblocks designs
- Watch videos made by Tinkercad enthusiasts
- Don't overthink it!
For more tips from our awesome Tinkercad community, here are some good reads about how they are using Codeblocks:
An Introduction to Tinkercad Codeblocks
Code Your 3D Designs with Tinkercad's New Codeblocks
And for more information on managing your classroom for making, how to assess a 3D design project, and more, please check out: How to Bring Tinkercad into Your Classroom.


7 Comments
3 years ago
I wanna join a class .. so could you send me your class code ?
Reply 2 years ago
you can do it your self you know and i am a 13 yr old thank you very much
3 years ago
i set up an account a few months ago.. still trying to get my printer but i got big plans for it from self draining bee hives to a hand pump thermal transfer.... the biggest project will be making legos out of recycling plastic into a 1.7mm thread.
Reply 3 years ago
cool
3 years ago
Very cool. With a little tinkering, I made something I will 3D print for Christmas!
3 years ago
This was a really cool activity that seems accessible to all ages, especially for those new to either coding, 3D design, or both! I LOVE the animated GIF export feature because it would give kids a "thing" to show their work without necessarily printing it with filament.
One thing I noticed that would be good to remind kids before starting: You have to first put an object on the work plane and THEN move it. This is especially important for kids who may be used to coding in turtle-based environments or Scratch.
3 years ago
Love this resource!