
Introduction: Designing Icicles With Codeblocks in Tinkercad


This has been written by Autodesk Tinkercad as a resource to support the 'Hour of Code™'. The Hour of Code is a nationwide initiative by Computer Science Education Week [csedweek.org] and Code.org [code.org] to introduce millions of students to one hour of computer science and computer programming. The 2019 Computer Science Education Week will be December 9-15, but you can host an Hour of Code all year-round.
Recommended grades: 7-8
Skills taught:
- Name ways people have used 3D printing.
- Find a repetitive pattern in code and use a loop.
- Save and use information in a variable.
- Read code and reason about it to find bugs.
This lesson is aligned with the CSTA K-12 CS Standards and the ISTE Standards for Students.
CSTA Standards: 1B-AP-10 Create programs that include sequences, events, loops, and conditionals. 1B-AP-09 Create programs that use variables to store and modify data. 1A-AP-14 Debug (identify and fix) errors in an algorithm or program that includes sequences and simple loops.
ISTE Standards: 4c - Students develop, test and refine prototypes as part of a cyclical design process. 5c - Students understand how automation works and use algorithmic thinking to develop a sequence of steps to create and test automated solutions. 5d - Students break problems into component parts, extract key information, and develop descriptive models to understand complex systems or facilitate problem-solving. 6b - Students create original works or responsibly repurpose or remix digital resources into new creations.
Other Subjects: Geometry Students will use x, y, and z coordinates.
Lesson overview: During this activity, students will create an icicle design in Tinkercad Codeblocks. In the process, they will learn the fundamental CS concepts of loops and variables. The program will be built systematically, so students learn how to create, test, and debug effectively. At the end, they will have a design they can 3D print if they have access to a 3D printer!
Estimated Instruction time: 60-90 minutes
Materials: computers, internet, Tinkercad (a free, easy-to-use, web-based 3D CAD design tool), teacher lesson plan and notes, slideshow for teachers; optional, but useful: 3D printer.
Step 1: Setup Tinkercad for Your Classroom

As a teacher, you can set up your students in a virtual Tinkercad Classroom. This eliminates the need for students to setup their own accounts! And, it even lets you quickly review your student's designs.
With Tinkercad Classrooms, you can get your students started right away! They just need a Nickname selected by you and a Class Code.

How to get started: Setting up your classroom is easy! First be sure you've signed up as a teacher on the Teach page, then follow this quick guide to create your classroom and add your students.
Just to note, Students under 13 can create a personal Tinkercad account with approval from a parent/guardian or use Tinkercad in a Tinkercad classroom created by their teacher.
Step 2: 'Do Now'!
To get your students in the mindset of designing a shape, start them off with a 'Do Now' exercise.
Do now: Get students thinking about designs by showing off a design, and having them make their own designs.

Step 3: Build Context Around 3D Printing

In the do now, students were designing decorative objects because they will use code to design a decoration that could be built by a 3D printer.
3D printing allows people to build 3D objects from models they have built on the computer. People use it for all kinds of things from making small fixes to items to building bionic arms and other toys. Let’s look at a few examples of how different people use 3D printing.

One example involves helping the Earth’s coral reefs. 3D printed objects are giving coral larvae a place to grow, helping to repopulate coral reefs.

3D printing also allows people to design innovative things that previous versions of manufacturing did not allow for. This includes really neat dresses. Share this video with your classroom to help illustrate.

Kids create things with 3D printing! Students from TechBoston Academy created 3D printed toys and showcased them as part of a project led by the design studio Mbadika. Toys included a utility belt, a bow and arrow gadget, and a high-tech medical pillow. Read more about what these students created.

Some people have even created 3D printed cars that can travel up to 68 miles per hour! After your students have considered these options, ask them which was their favorite, and why, and then have them dream big to imagine what else 3D printing could do.
After the discussion, inform students that it is, in fact, possible that they can get future jobs solving this problems with 3D printing. This article shares some possible ideas:
- 3D chefs might use 3D printers to make food the perfect size. Food Ink is already doing this!
- Space Architects will print things on the ISS.
- Body Part 3D designers and creators. Soon, doctors may be able to 3D print organs to save lives.
- 3D printing artists can make cool designs - you’re well on you way to that with what you are doing today.
- 3D mechanics can replace car and other mechanical parts

Step 4: The Math That Makes Icicles

Snowflakes have long been studied by scientists for their mathematical formations, but what about icicles?
Scientists have already come up with the mathematical equation that builds stalactites and stalagmites in caves. This surprised scientists because the physics behind how stalactites and stalagmites and icicles is very different.
With this exercise, students use shapes and math to make icicle-like structures. Encourage students to read this article and think about how math shapes the formation of icicles.
Step 5: Log Into Tinkercad and Introduce the Kind of Design That Will Be Created

Once students are logged in, they can choose Codeblocks from below their profile image on their main homepage. On the next screen, they should choose "New Design."
Log in to Codeblocks!

Are you completely new to Tinkercad Codeblocks? Check out this Quick Start Guide to learn everything you need to get your students started. We've also included more quick start information about Tinkercad in the final step of this project.
Step 6: Build Their First Tinkercad Shape
Once your students have logged in, they can start thinking about the designs they will make. Show them some pre-created designs. They should notice that the designs are made up of the same shape over and over.
It’s time to learn how to make a shape in Tinkercad.
Demonstrate how to create their first shape, and what the varying numbers do, and let them explore the block.
This is how you grab a shape block:
- From the shapes menu, click on the “paraboloid” block
- While holding the mouse, drag the paraboloid block out to the grey space.
- Press the play button. A shape should appear on the screen
- Click on the arrow on the side of the block.
- More numbers will show up. Change them, press the play button again, and see what else changes.
Note the names of the parameters on the paraboloid. “Radius” means the length from the outside of a circle to its center. What happens when you increase the radius? Decrease it? Have students play with each of the available parameters.

As you're walking around the classroom, consider asking students some of the following questions.
Note the names of the parameters on the cone.
- What is a radius? A: The distance from the center of the circle to its edge.
- What happens when you make the bottom radius bigger than the top radius? A: The cone points up.
- What happens when you make the top radius bigger than the bottom? A: The cones point down.
- Which direction do icicles usually face? A: Down.
- What does changing “H” do? A: Changes the height of the cone.

The answers:
Step 7: Make It an Object
This is important so the icicles move separately from the block that will be on top of it.

Step 8: Moving Shape Blocks
Icicles will need to be next to each other, which means this icicle will need to move. Demonstrate how to move the icicle, and then have the students do it for themselves.
To move shapes: Click on the “modify” menu Drag out the move block Place it under the code for the paraboloid. The tabs should connect.
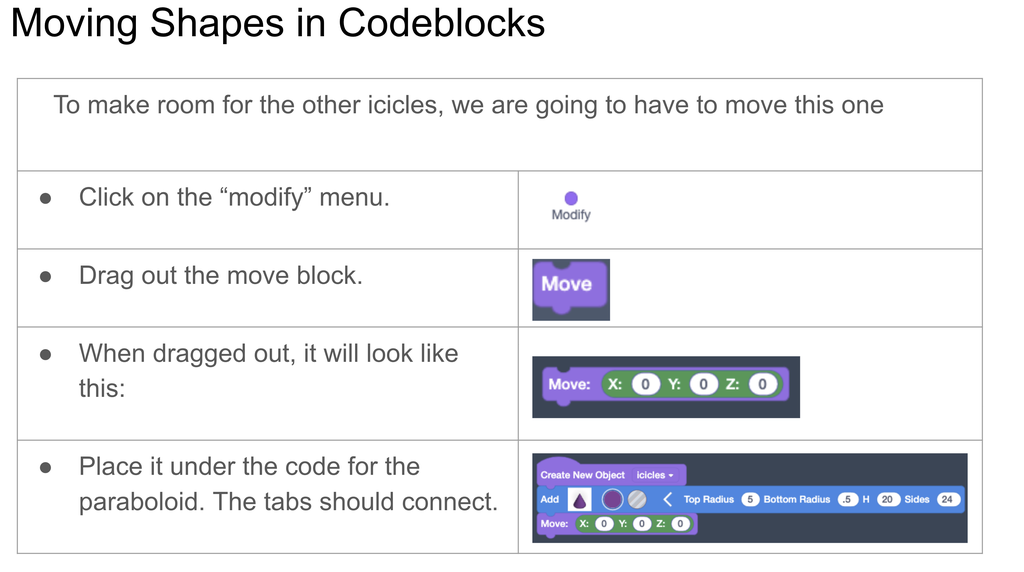
Students may notice the x, y, and z that show up in the move block. The will probably not know what this means yet.
Remind students about x and y on the coordinate plane. X and Y. Ask them: How many dimensions does that cover? The answer is just 2 - up and down and left and right. Now that they are modeling things in 3D, they need forward/backward, up/down and left/right, so there is now a Z axis.

To figure out which letter does what, demonstrate changing the number in just X, just Y and just Z. Which one should they change to move the direction they want? It will probably be X, though if they are building front to back Y is also not an incorrect choice.

Ask the students: How far does it make sense for each icicle to move? Eventually, a student will come up with that it should move 2x the radius.
Ask the students: How would you add another icicle? The answer is the same exact way that you created the first one - drag out a shape block and a move block.

Drag out a shape block again, and move it again. The icicle will move on top of the other icicle. We want both the icicles to move at the same time so we need to group them.
Step 9: Grouping Shape Blocks
In order to move the whole set of icicles, not just one, you need to use the “Select all” block. Show students how to do that. It does not make sense now but it will be important later.

Step 10: Adding a Loop
There are a lot of constructs in Computer Science that make it easier to write code in a shorter amount of time, to use patterns to the programmers advantage. One of these constructs is known as a loop. In Tinkercad Codeblocks, we’ll use the repeat block as our loop.
Show the students the long, 12 block code. In this 12 blocks of code, the same 3 blocks the students have already learned repeat 4 times. Help them find that pattern.
Patterns
Do you see a pattern in this code?

Show the students what code looks like without a loop (12 blocks long) and what it looks like with a loop (4 blocks long). This is the power of repeat loops. The code is easier to read and shorter to create, yet it does the exact same thing.
Loops
Look at these two versions of code. They do the same thing!
Which one would you rather write?

Loops

Step 11: Introduce Randomness
Right now, all of your icicles are the same size. That is not usually true about icicles!
Let’s start by randomizing the size of the icicle bases.
To do this:
- Click on the Math menu
- Drag out the “Random” block
- Place it inside the “Radius” part of the “paraboloid” block. Run the code and see what happens.

Step 12: Hiding Heights With a Box
You may notice at this point that the icicles are starting at random points on the Z axis. To fix that, we’re going to put a box on top. This box will NOT be part of our icicle object. It will be it’s own object! Think of it as the “roof” over the icicles.

Ask students: How are we going to add a shape? Students should know by now to look in the “Shape” Menu.
Then, instruct them in how to make a cube.

Ask students: What should the width of your box be in order to get around all the icicles? It needs to cover the tops of all the cones. One cone is the length of radius * 2, so take the value you’re using for the top radius * 2, and then multiply that by the number of cones you have. What should the height of your box be in order not to hide all the icicles? The shortest icicle should be taller than the box.
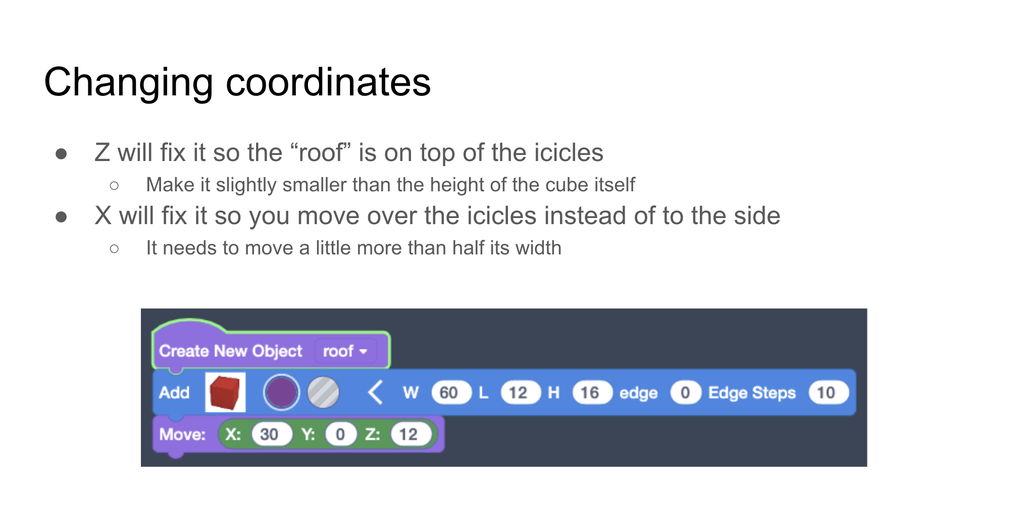
When you run this code, you’ll note that the box is over only half the icicles. Ask students what they think will fix that problem; it’s a block they already know: the move block.

Ask students: Would changing x, y, or z fix this problem?
The answer: Z will fix it so the “roof” is on top of the icicles Make it slightly smaller than the height of the cube itself X will fix it so you move over the icicles instead of to the side It needs to move a little more than half its width.
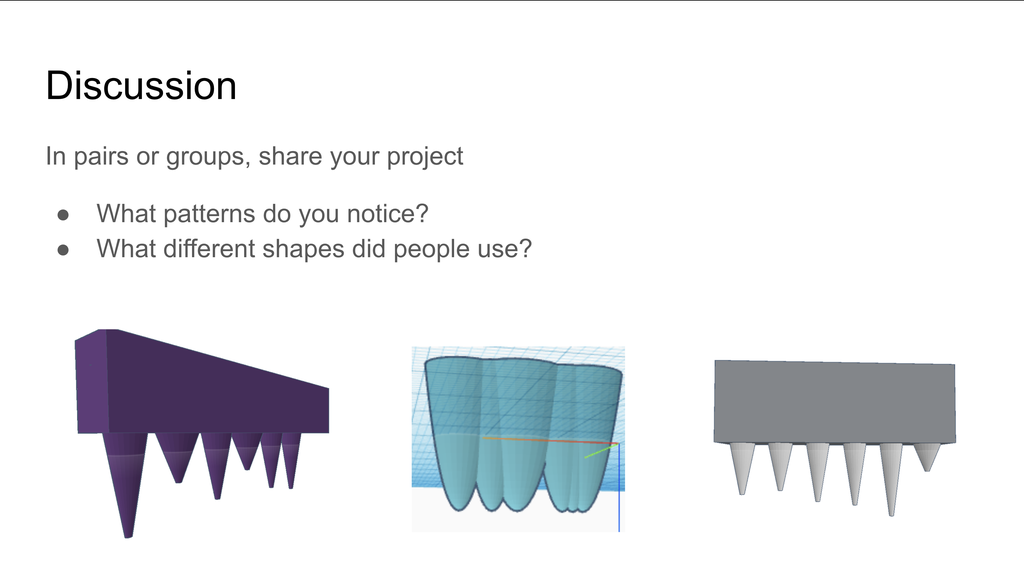
Step 13: Let Your Students Explore!
Finally, your students have all the skills they need to create their own bursting star decorations. Have them explore different points on the star, different repetitions, different degrees, using different shapes. Let them make their bursting star designs their own.
Students who want to extend the project further with blocks you haven’t explicitly taught can do things like:
- Try different colors or shapes.
- Try different sizes for the radius at the top.
- Change the size of the box or change the shape of the "roof".
- Add holes to the top to hang for decoration when you 3D print.

Step 14: Create a GIF

Are your students in love with their icicle designs? With just a tad more technological magic, you can help them bring their designs to life.
For near-instant gratification, your students could make GIF recordings of their Code-CAD creations. This can be done inside the Tinkercad Codeblocks editor by hitting the Share button and then choosing to "Save Gif" in the next screen. Make sure you run it first in the editor. (Note: It takes a few minutes for your GIF to package and download. Totally worth the wait!.
As their proud teacher, you might also ask permission to share some of their work yourself - in the spirit of "demystifying coding." (If you post on social channels, please tag us @tinkercad and include the #HourOfCode or #CSEdWeek hashtags)
Step 15: Gallery Walk

When there are approximately 10 minutes left of class time, it’s time to celebrate your students’ hard work and creativity. First, let them show off their work with a gallery walk.
Let your students know it is ok if they are not done; this is a celebration of what they have so far.
Students should leave their computers open, with their designs on them. All students should start walking around the class, holding post-it notes and pencils. Students should leave at least one comment on each project they pass.
Have a conversation with students about useful feedback. Ask them what kinds of comments they think are kind, what kinds of comments they would like to receive on their own work, etc. From there, build guidelines around what they should say to each other.
After the students have done their gallery walk, give them some time to read their feedback, and then reflect as a class on how feedback felt.
- Walk silently around the classroom, looking at people’s projects.
- Look at the image your classmate created.
- Leave one “Glow” (a thing you like).
- Leave one “Grow” (a thing you think could improve).
Step 16: Make It Real! (optional)
If you and your students have access to a 3D printer or other fabrication equipment, their icicle designs could be transformed into ornaments, decoration, and more.
The easiest way to do this would be to export their code-generated designs into their Tinkercad Parts Collection. By making the design a Part, students can then easily modify the design in the original Tinkercad 3D editor, for example, by adding a Torus shape (for attaching a hook to a 3D print) or a base (to make a 3D print more stable if your students go sculptural in their design.)
Students could also keep the design more 2D and laser cut it or make it into a sticker! For more info on how to make an .SVG from your Codeblocks design, read this Tinkercad blog post.
Step 17: Celebrate!
Congratulations! You and your students have taken a journey into 3D modeling, design, and code! Now that your students are done, we encourage you to celebrate with them by printing an official Hour of Code certificate. Send your students here to print a custom certificate.

The 'Hour of Code™' is a nationwide initiative by Computer Science Education Week and Code.org to introduce millions of students to one hour of computer science and computer programming.
You can also download a congratulations certificate from Autodesk® Tinkercad™ to celebrate your student's success!
Step 18: Appendix | Getting Started With Tinkercad Codeblocks
If this is your first time teaching a project that integrates CAD and code, here are a few helpful hints to get you started:
- Visit the Tinkercad Codeblocks page
- Read this blog post: CAD and Code, Together at Last
- Explore the starter Codeblocks designs
- Watch videos made by Tinkercad enthusiasts
- Don't overthink it!
For more tips from our awesome Tinkercad community, here are some good reads about how they are using Codeblocks:
An Introduction to Tinkercad Codeblocks
Code Your 3D Designs with Tinkercad's New Codeblocks
And for more information on managing your classroom for making, how to assess a 3D design project, and more, please check out: How to Bring Tinkercad into Your Classroom.


2 Comments
3 years ago
Thanks for this awesome post!
Reply 2 years ago
i do not git it