
Introduction: Perpetual Calendar With Google Calendar Connection


This project is an improved version of the calendar that I made more than a year ago, it still works very well and has become a common object in my living room. I'm a little more conservative, I don't always have the phone in my hand and I like that I can see a monthly calendar in front of me and notice at a glance what date is today (often I forget) or next week on what date the weekend starts and very important, when the payday will be :)
There are two major differences of this construction compared to the previous project: The body of the calendar is 3D printed, except for the piece of smoked acrylic that can be cut by hand; The calendar can be synchronized with one or more calendars defined in Google Calendar. There are also other small differences that I will present in the following steps.
Step 1: Notes on Operation
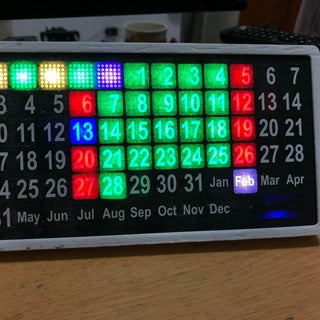
The principle of operation of the perpetual calendar is the same as in the previous project, ie the digits of the days of the months are placed in such a way that any month can be displayed according to the LEDs lit behind the numbers. In the figures below you can see how January and February of this year are displayed. Please note that the numbers remain in place, only the LEDs light up in other positions and colors: weekdays - green, weekend - red, current day - blue.
January 13 2022 - first day Sunday 
13 January 2022 - first day Monday 
February 19 2022 - first day Sunday 
19 February 2022 - first day Monday 
Clever isn't it? :)
In terms of syncing with Google Calendar, I did the following: I created two new calendars: anniversaries and to-dos, and I imported an existing calendar: holidays (specific to my country) In the program I synchronize with each calendar one after another, I initialize three arrays of integers corresponding to the days highlighted in each Google Calendar, for the to-dos calendar I check every minute and the other 2 calendars every hour (more about this in the software step)
The LED for a specific day lights up in a certain color, depending on the calendar it belongs to, in the order: holidays > anniversaries > to-dos. So if one day it is a holiday and also an anniversary, the LED lights up in the color chosen for anniversaries, if it is a holiday an anniversary but also a particularly important event (to-do) then the color will be the one I set at to-dos.
I chose the three colors corresponding to the calendars as a mixture of 2 primary colors: magenta (red + blue) for holidays, cyan (green + blue) for anniversaries and yellow (red + green) for to-dos, as you notice I wanted the colors to be as much as possible distinctive (later I used slightly different colors check the software step). To display the months I used white (ie a lighter gray).
Please see for many more details about how the calendar works in my previous article….
Step 2: Materials Required


Very few things are needed...
- 3D printed components - you can find the project on Tinkercad, I also attached the STL files below;
- A piece of 2 mm thick 191mmx96 smoked acrylic
- 75 WS2812 LEDs in a strip with 60 leds/m;
- An ESP-01 module,
- A 5V/3.3V stabilizer module;
- A DC female plug with 5.5mm/2.5mm cable;
- 5V/2A power supply with 5.5mm/2.5mm DC male plug;
- White colored paper;
- Wires of different colors, hot glue.
The size of the components printed on the 3D printer allows printing on almost all types of 3D printers with the standard size of the printing table.
I cut the smoky acrylic piece carefully because the size should be as accurate as possible, and I rounded the corners with sandpaper until it fitted correctly in the calendar frame.
There are two grid variants on Tinkercad, I used the version with the 6 LEDs without separations.
Attachments


Step 3: Construction


I started with 3D printing of the parts. I cut and prepared the acrylic plate. I cut from a strip of LEDs 5 pieces with 13 LEDs and one piece with 10 LEDs.
The hardest part followed: mounting the pieces of LED strips on the LED support. In the photos above you can see how I did this, positioning the LEDs between the bumps in the support and pressing them (I used a plastic stick) as best as possible for a good adherence of both the LEDs and the rest of the strip.
With the help of this bumps I was able to bring the LEDs closer to each other at a distance of 12mm (as if it were a LED strip of 83 leds/m).
Please note the directions in which the LED strip pieces are positioned.
I then made the connections according to the electronic scheme above. I did it very carefully so that the soldering gun would not melt the calendar LED support.
You may be wondering what is the role of the 3K resistor positioned between the GPIO2 and Vcc output. Well, I have had cases when, due to the LED strip, the digital output of the ESP-01 module does not remain HIGH at module boot and because of this the ESP does not start normally. If I connected the LED strip after boot everything worked fine, so the presence of 3K resistor is absolutely necessary in this case.
I fixed with a few drops of hot glue the ESP-01 module and the 3.3v stabilizer in the slot in the support, I made the connections and glued the power cable. Over the support I put the 3D printed grid then the printed paper with the numbers of the days and the abbreviated names of the months (the A4 sheet in a PDF file is attached below), followed by the piece of Plexiglas and over all I fixed the 3 printed frame.
With a piece of 1mm thick double adhesive sponge I fixed the support leg on the back of the calendar holder.
You can follow all these operations in the photos above.
In the LED support you can see that I have provided some cut-outs in which, at the end of the tests, I can put a few drops of super glue to fix the LED support to the frame.
Attachments

Step 4: Software


The program to be uploaded to the ESP-01 module is on Github and is based on the program I used in my previous perpetual calendar project so I will insist on things that are extra or different.
Of course, the biggest difference is in the part of synchronizing the ESP module with the calendars I have previously defined. For this sync I used the https redirect library which you can find on github. I was also inspired by his project Alexander Spiess - Reminder with Google Calendar which you can also find on github.
I created two calendars in the normal way, ie in settings > add calendar > create new calendar, I defined two calendars with the name “to-dos” and anniversaries. The third is already defined and refers to national holidays. I added this calendar from browse calendar of interests > regional holidays > holidays in Romania.
The links (as javascripts) to these three calendars must also be defined, so I went to Google Drive where you can find Google Apps Scripts in new > more. Here I have defined three projects, the only difference between them being the name of the calendar. The source for this scripts is below.
function doGet(){  // Logger.log(ContentService.createTextOutput(GetEvents()));
  return ContentService.createTextOutput(GetEvents());
}
function GetEvents(){
  var _calendarName = 'Holidays in Romania';
  var Cal = CalendarApp.getCalendarsByName(_calendarName)[0];
  var Now = new Date();
  var firstDay = new Date(Now.getFullYear(), Now.getMonth(), 1);
  var lastDay = new Date(Now.getFullYear(), Now.getMonth() + 1, 0);
  var events = Cal.getEvents(firstDay, lastDay);
  //Logger.log(events.length);
  var str = '';
  for (var i = 0; i < events.length; i++){
    str += events[i].getAllDayStartDate().getDate() + '-';
  //  str += '\n';
  }
    str += '\n';
  //Logger.log(str);
  return str;
}
Then I proceeded to each of these scripts as follows: first of course I changed the calendar name, then I deployed as a web app with permission to run from anyone. A window appears at this point where I was able to copy the link script ID. Then I ran the "do get" function, a window appears in which I have to "allow" access to my Google account. One observation, when running the “do get” function, I had to make sure that everything works correctly, ie there is no error in the log.
I finished the online part and switched to the program on the ESP module. I have defined three one-dimensional matrices for holidays, anniversaries, to-dos. In the ESP module web server menu I defined a new entry which I named Apps script settings. Accessing this page can save the link script IDs. After saving these IDs, by running the "getCalendar" function I should take in the calendar variable the date of the important days as a string of numbers separated by hyphens. This string is processed in the "initDatesArray" function where the arrays corresponding to the accessed calendar will be initialized with the days in integer format. These days will then be displayed on the perpetual calendar.
Why three separate calendars? Because it is easier to deal with in code and it seems that the important days are easier to define.
As I said in the operation step, the calendar check is done sequentially: minute by minute the calendar of to-dos is checked and the other two, the holidays and anniversaries are synchronized hour by hour, everything is re-displayed and the LEDs lighting order is: holidays, anniversaries and to-dos. Thus, in the function of lighting the LEDs, for the first time, the working days light up in green, the weekend days in red, then the holidays, the anniversaries, and finally the to-dos in the predefined colors.
An important note: When defining days in Google Calendars, they must be "all day" events, not events at a certain hour, otherwise no date in Google Calendar will appear on the perpetual calendar.
The first six LEDs (order numbers 62 to 67 from the led strip) can be used for different things: as the background light of a message printed on paper (as I tried in my previous perpetual calendar project), small light effects, but you can also give them up completely and not light up at all.
An interesting application could be to use these LEDs as a clock. In my article "Color Coded Clock - Colors Show the Time" I analyzed which would be the best colors for displaying "digits" from 0 to 9, with colors as distinct and beautiful as possible. If you want to try this option you must uncomment the line "#define COLOR_CODED_CLOCK" in the source.
Step 5: The Calendar During Operation
Below is a very short video to see what the perpetual calendar looks like during operation.
As an observation, I have to tell you that in reality the colors are much clearer and easier to distinguish.
Step 6: Some Conclusions
The calendar in the end is very compact and nice and the fact that the components can be printed in 3D is a big plus from my point of view.
After a few days of testing the operation, I think I would give up displaying the seconds in the color-coded clock, especially since I am familiar with the color-coded numbers. But I would also get rid of the clock-lock phenomenon at the next minute change when the second count stops during syncing with google calendars.
I also think that I will give up the to-dos calendar, it seems that the perpetual calendar with too many colors becomes too strident. The holiday and anniversaries calendar are enough in my opinion.
I hope that as many of you as possible will try to build this calendar, and of course I look forward to your questions and comments.

Runner Up in the
Anything Goes Contest 2021


50 Comments
Question 4 months ago on Step 1
hello Mr Andrei,
i made your fantastic Project but i have an issue, i follow step by step instructions, i check all connection but when i start ESP the light start with a joke but after ten second they stop and the calendar don't start..... do you have some suggestion?
thnks for your answer
Answer 4 months ago
joke? what it means? the 62-th led is red or maybe the rainbow effect after connecting to the router? if you followed the steps maybe there are some defective ws2812 leds ...?
Reply 4 months ago
How I can send you a video for explain better? I try here… power up esp…. The first led light a bright yellow after 3 seconds start a moving rainbow on all leds then after 5 seconds rainbow stop with all led light.
Reply 4 months ago
When the rainbow effect stops, the code has reached the part of connecting to the ntp server. If there are connection problems, then the code could be blocked for a while and the rainbow effect will continue. The fact that you actually get stuck when connecting is strange, it's never happened to me. Try to change the address of the ntp server (maybe you don't have access to europe.pool.ntp, I don't know where you live, if you are not from Europe you should choose another pool) but it could also be a defective esp module or with low memory. Try to see if you have any messages on the serial connection.
Reply 4 months ago
Thanks Andrei I try another server but strange I live in Italy, I will send you on your Mail one video so you can help me better.
Thanks again
Marco
Reply 4 months ago
Thanks to Andrei for his helps, the code must be uploaded with compiled de source with esp8266 framework 2.7.4, because higher version have some issue.
Now my perpetual calendar work perfect!
Reply 4 months ago
i send you a mail on andrei.erdei@gmail.com with picture and video
1 year ago
Nice project.
Especially with the rgb, its nice as upgrade to change colors maybe like, show your To-Do's on the right site of the calender because when you see it like this its really confusing for what the special days are.
Question 1 year ago on Introduction
Answer 1 year ago
Thanks for your appreciation
Yes, it is possible.
If you do not have or do not want to have the external connection through the router you do not configure anything in the "Network configuration" menu but in the "Manual time setting" menu you can set the exact date and time. The calendar will work without taking over external data. And yes, the colors for weekdays, weekends and month will be displayed correctly. Please note that ESP's internal clock is not particularly accurate and you will need to reset the date after a few months.
But if you still want the calendar to be connected to the internet and to automatically take the date from a NTP server, the program will work correctly, it will only "attack" the google server from minute to minute. You can avoid this by commenting out the lines of code that refer to this action (or even simplifying the code by removing what is not needed) in the main .ino file. So you can comment out the whole "if" between lines 428-441, lines 445, 452 with the "getCalendar" function and line 464 with the "EventsDisplay" function. But, as I said, many more things can be eliminated. The colors for weekdays and weekends (and month of course) will be displayed correctly ( "CalendarDisplay" function)
Hope it helps.
1 year ago
Wirklich ein tolles Projekt. Leider stellt mein Kalender keine Verbindung zu Google her.
Muss in der Hauptdatei der .ino irgendetwas angepasst werden??
zB hier???
//Calendar connection Settingsconst char* host = "script.google.com";const char* googleRedirHost = "script.googleusercontent.com";const int httpsPort = 443;
Freue mich auf eine Antwort!
1 year ago
Nice project.
Would it be possible to change the BRIGHTNESS with 2 buttons?
Reply 1 year ago
Of course it's possible.
1 year ago
Looks Great!
Reply 1 year ago
Thank you!
Question 1 year ago
Where to enter all network data, name password, etc.?
Answer 1 year ago
Check the source code on GitHub and also this step from one of my previous instructable
Reply 1 year ago
I don't see through this, a little confusing.....
Reply 1 year ago
Can you be more specific?
If it's about connecting to the router, have you read about this in my
instructable "VERBIS - Desktop 8x8 RGB LED Matrix Word Clock" and it hasn't cleared you up at all?
Also if you want to see how the interface works then you can easily test everything with a Wemos D1 Mini, download the source, compile, upload the program and play with it. You don't have to actually make the perpetual calendar for this.
Reply 1 year ago
Megcsináltam volna ezt a Kalendáriumot, de az a probléma hogy ez nem ilyen amatöröknek lett készive. Gondolom egy profinak nincsen vele problémája, de én sajnos csak egy barkácsolo tipus vagyok. Általában csak a programmokban egy két adatot be kell adni és többnyire meg van adva hogy hova. Ez itt sajnos nem igy van. Kár mert szivesen megcsinátam volna! Minden jót!