
Introduction: Choo-Choo Chairs: a New Life for Boston's Metro Seats


The Boston Metro (MBTA), the oldest subway in America, is replacing all of the Red Line subway cars over the next year or so. The Red Line runs from deep in Cambridge to deep into Boston, and for years, I was one of the many thousands of people commuting on these trains daily. With a bit of persistence (see step 1), I was lucky enough to get my hands on some seats from the old trains. The original red line trains were built in 1965, but these seats are only a few decades old. After some other shenanigans with a few of the seats, I decided to run a class to give them a second life as chairs. Bobby, Cathy and Madavin did an amazing job and built some beautiful and extremely strong chairs made only from re-used parts.
Supplies
Materials:
MBTA Red Line Seats
Re-claimed Church Pews
Cleaning Vinegar
Bolts
Glue
Gel Varnish
Tools:
Table Saw
Miter Gauge
Tenon Jig
Jointer
Planer
Table Router
Thickens Sander
CNC Router
Just to make jigs
Chisel
Pull Saw
Clamps
Socket Wrench
Drill
Wire Brush
Step 1: The Team


This project was run as a class in the MIT Hobby Shop. The chairs were designed by me, Coby Unger, and built with help from Bobby Johnston, Cathy Melnikow, Madavin Vong, with teaching assistance from Michelle Lauterback. Thanks also to Andrew, Jay, Steve and Michael at the MBTA for hooking us up with old seats and to Joel for giving us access to the church pews and to Bob, Fred and Jerome for helping to dismantle them all.
Step 2: Every Material With a Story


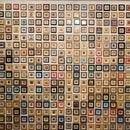
One day in early February 2022, coffee in hand, I was surprised to find myself boarding a bright clean quiet Red Line train in Davis Square. This was different.... It looked different, it smelled different, it sounded different. The seats were a brand new red foamy material rather than the purple patterned carpet I was so accustomed to. Upon sitting down, and taking in the new look on that peaceful morning, my mind quickly drifted as I wondered what was the fate of the old seats. In past journeys, I had admired the stainless steel construction of these seats and their iconic (some would say ugly, but not me) fabric. So I did some quick internet searching and found some email addresses for the sustainability office at the MBTA and shot them a quick email. A long shot, I thought, but how cool would it be to get a seat from the old trains?! Many, many emails later, and a home-made shirt (to convince them I was really invested in the cause), they agreed to give me some chairs. To my further surprise, they even gave me some fresh upholstery pads for the seats as well. Just goes to show how far persistence goes...
As for the wood, that is a different story. A couple months before the whole red line story starts, my colleague Hayami at the MIT Hobby Shop asked "Hey, do you want a bunch of old oak?". It turns out that his friend's company had just bought an old church and were planning on converting it into apartments. They had no use for the pews, but recognized it was decent wood. If we did the demolition and hauled it all out, we could have all the lumber. So I called up a few my friends, and a few of my dad's friends, and we spent a Monday dismantling a church. A few months later, another friend asked me if I wanted still more oak church pews from yet another church. So here I am with two churches worth of pew wood. Thank goodness I have access to a couple barns for storage.
Step 3: The CAD Model

We ended up using the CNC router very little in this project (just to make jigs), but even so, having a Fusion 360 model to refer back to periodically was quite helpful. We used it to confirm dimensions and angles throughout the project. The model only includes the legs, since the subway seat was pre-made and not modified at all.
Step 4: Cleaning the Seats


The construction of the MBTA seats was, as it turns out, even more impressive than I had thought. The upholstered cushions fit on with a couple simple tabs and two lock nuts. They are almost completely made of stainless steel except for, very disappointingly, the structural members where they attach to the train. And it turns out that decades of service on a train, and a few too many spilled sodas, meant that there was some rust to contend with. Nothing a couple wire wheels and a bucket of cleaning vinegar can't solve. Pro tip, wear gloves next time.
Step 5: Rough Cut Wood


I designed the legs so that each pair could be cut from one church pew end support. We used the band saw to roughly cut the pieces. The pew base was nailed on through oversized holes and was easy to take off. We eventually used these parts as the top of the chair base.
Step 6: Dress Wood


After rough cutting, we jointed and planed the pieces so they would all be straight and exactly the same thickness. This was also a great way to get rid of all of the dark old churchy stain covering up the beautiful oak underneath.
Step 7: Leg and Apron Cutting


The back and front legs are at slightly different angles and so are slightly different lengths. We cut the angles with the compound miter saw, and used a simple tapering jig on the table saw to cut the leg to final width and angle. The tapering jig is a sled that slides in the slots of the table saw, with an angled fence and toggle clamp. These are easy jigs to make, but endlessly helpful for making repeatable tapers.
Step 8: Half-Lap Joints


A 90 degree half-lap joint is quite simple to achieve in a number of ways in the wood shop, but we have angles to contend with. 5 degrees for the front legs and 15 for the back. We cut parallel to the top of the leg with the miter gauge on the table saw and then parallel to the face of the leg with custom jigs for the tenoning attachment for the table saw. We made 4 unique jigs for each of the legs to keep the thickness of the half-lap consistent across all legs. This is the first time in the project where the legs are no longer "ambidextrous". Much to the chagrin of the students in the class, the table saw blade did not reach quite high enough to cut the joint completely, so we had to do some saw and chisel work. But wow, look at those joints! So clean!
Step 9: Swing Break!


Everyone has been working hard on this project and deserves a break. We strung up one of the seats on stainless steel cables and did some swinging. The chisel technique demonstrated in the above picture is NOT recommended. Always clamp your work and never use sharp tools while swinging. Also a bike, because why not.
Step 10: Glue Glue Glue


Half laps are relatively straight forward to glue. Nothing fancy, we just had to make sure all the seams were closing. Glue should be applied to every surface that makes contact when the joint is assembled. Each leg gets one F clamp and dried for at least 6 hours.
Step 11: First Sanding

The half-lap joints were really tight, but to make sure there is no thickness discrepancy between the parts of the chair after gluing, we put all the leg assemblies through the thickness sander.
Step 12: Another Angled Cut


For a little added stability the legs splay out sideways by 5 degrees. This angle should have been a simple table saw cut, but the blade was too close to the end of the fence, so we had to make a quick extended fence to cut cleanly.
Step 13: Aprons


We'll call the top piece of each leg assembly the apron. It's not quite the same as a table apron, but I don't know what else to call it. These are what eventually bolts to the MBTA train seat. The lumber for these is from the bottom of the pews and it already had 4 perfectly placed holes for screwing it in place to the rest of the leg assembly. We cut the ends of these pieces to match the leg angles and added the 5 degree taper before gluing and screwing them on. The angles were cut at the top of the leg assemblies so that the leg gets trapped in the half lap joint when the apron is screwed on. This probably isn't, strictly speaking, necessary, but it adds some strength in hope that the chairs will last as long as they did as train seats.
Step 14: Chamfers


We used a router to add a simple chamfer to most of the corners for comfort and aesthetic appeal. In hindsight, we should have done this to the inside corners before attaching the apron, as now, they are inaccessible by a router bit.
Step 15: Stretcher


The final table saw step on this project was to add a stretcher to the back legs. Once again, probably not ultimately necessary, but what's the point of building if we aren't over-building. We used the miter gauge and a dado blade to cut a slot in each back leg at the 5 degree angle to match the splay of the legs. We cut the stretchers from leftover pieces of oak. As a fun aside, to make a bench rather than just a chair, the only dimension that needs to change is the length of the stretcher. Then two or three seats can be bolted together as they were on the train.
Step 16: Bolt Holes


The seats already have holes drilled in the steel structural members, so for assembly, we just needed to drill matching holes in the wood and bolt them together.
Step 17: Sanding and Finishing


For many beginner wood workers (and many with experience too I suppose), the sanding phase is met with much dread. My only advice here is to put on some good music and submit yourself to your new temporary reality as servant to the scratch marks. We sanded the legs to 220 grit and finished with 3 coats of General Finishes Gel Topcoat.
Step 18: Assemble!


The moment we have all been waiting for. Time to assemble the chairs. 2 nuts hold on the upholstery, 4 nuts and bolts hold on the legs, and 2 wood screws hold on the stretcher.
Step 19: Field Trip


*This is not an ad for Dunkin' Donuts.*
The only thing more Bostonian (or Cantabrigian) than the MBTA is Dunkin' coffee and donuts on the MBTA.
Here are some selections from our album cover photo shoot. If only we could play music.....

First Prize in the
Reuse Challenge


18 Comments
5 months ago
The MIT Hobby Shop has some fantastic equipment and you put it to very good use! I think even Norm Abram would be jealous of the 4-foot belt sander :-)
Foam and fabric seats may be impractical in a subway, but they were far more comfortable than the hard plastic seats on the new cars. Does anyone remember the black fake leather seats originally installed in the 1970's vintage all-aluminum Red Line cars? The seats were often cut and the layout (mostly in rows rather than parallel to the sides) didn't allow as many standees, but they were also comfortable. (Many Naugas gave their lives to obtain them. RotJ reference.) Being non-porous, they weren't as vulnerable to spills and random fluids, but they were pretty easy to cut. BTW, I think those silver cars are still in use but the outside has been painted mostly red. The fabric seats were about the 3rd generation of seats installed in them.
5 months ago
Read the article in the Globe after seeing this on Twitter some time ago; did not know the fabric was supposed to be a reference to the four T lines. I do remember thinking fabric was an unwise choice for a subway seat when they first installed these, although it’s clearly of the more bulletproof variety. Fantastic reuse of the chairs (although I think I would prefer a continuous apron in the front) and I now regret not spending time in the hobby shop when I was a student in days of yore. I would love to be notified if you do make any more for sale/auction.
5 months ago
Very cool project - the seats with history + special thanks for saving the oak wood. Thinking about all the labor + energy that went into that - and you saw the history and gave it a future (and have barns).
6 months ago
As a former red line commuter, I'm curious about how you addressed the... condition of the fabric - given the subway smells, spills, and years of use.
Reply 6 months ago
almost all of the seat fabric they gave us was brand new, never been on the trains.
6 months ago
Amazing ible so detailed and great photos - the finished chairs are so cool!
6 months ago
These are so cool, and a great idea. I’d be first in line if they’re available for sale or auction.
6 months ago on Introduction
if it’s for sale i would love to know how to buy!
Question 6 months ago on Introduction
So cool - are these for sale? I’d love to have one.
6 months ago
These are incredible! If you'd consider selling some I'd love to buy one!
6 months ago
Are these for sale anywhere? Very cool!
6 months ago on Step 19
I have great admiration seeing talented people recycle or repurposing and making a beautiful product. Thank you for sharing! Well done!!
Reply 6 months ago
Thank you very much. It was such a fun project.
6 months ago
Nice! That's cool that you convinced them to give you some chairs. I would have never thought to ask, let alone look for a sustainability office.
Reply 6 months ago
RANDY! Hope you are well. Turns out almost everyone has a sustainability office now.
6 months ago
Really cool project 😃 and it's funny that public transport seats where I am have the same pattern and I'm not even in America
Reply 6 months ago
Oh cool! where are you that the pattern is the same? I'd love to see a picture of the seats.
Reply 6 months ago
I don't know if I can find it now but I've definitely seen them before 😆 I'm from Europe