
Introduction: The Simply Impossible Puzzle


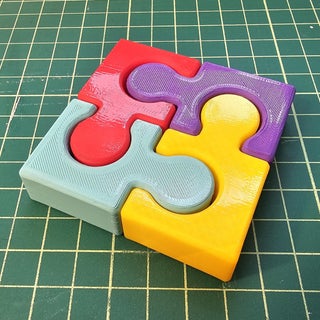
We are going to make a deceptively challenging 4-piece jigsaw puzzle.
A quick look and you will think this thing belongs in the kids section of the toy store -- a three-year-old would have a great time with this
... then you pick it up and begin to play ...
Whoa! It turns out this puzzle is difficult. Quite difficult!
Simply Impossible
The issue with the puzzle is that the sides of the round section are tapered. The hole is narrower at the top than the bottom. So to take it apart the path is a dead end street; there is only one way out:
- If all tabs of all pieces must slide down to exit the hole of the adjacent blank, then obviously all blanks must slide up to release their tab. (The blank is the hollow round section where the tab fits into.)
- But each pair of tab and blank on the same piece are physically connected. Therefore every time a tab slides down the corresponding blank must also slide down.
- An endless loop of contradictions!
(But it actually is possible to solve this problem. That is the challenge!)
Easy to Make
Luckily it is an easy thing to make if you have Fusion 360 and a 3D printer. The steps are so simple I was amazed that I could not find one on Thingiverse or any of the other 3D printing websites I visited. So I figured I might as well go ahead and make one myself!
These are the instructions on how to create it in Fusion 360 complete with a half-hour video showing start-to-finish the Fusion 360 steps. Along the way, I'll show you a couple of interesting features in Fusion 360. And I'll show you a couple of tricks you may not have discovered yet.
Loft and Offset and STL
The coolest tool that you might find interesting is Loft. Key step: I used Loft instead of Extrude to make this. You may also be interested in how I used a circular pattern to duplicate features four times. Also interesting is the Offset Face tool used to put important gap between pieces.
You could think of this Instructable as instructions on how to create a cool puzzle. Or you could think of it as a Fusion 360 tutorial on how to use Loft and Offset Face.
Or maybe you just want to skip all the words, download the STL, and print. Afterall everyone loves a great puzzle, right!
I also posted the STL file on Thingiverse if you prefer to download it from there.
Stocking Stuffer (Easy Gift)
I think this will make an absolute perfect Christmas stocking stuffer! AndyGadget has already made three of them for this purpose (Thank you AndyGadget for the comment! I love comments!). Probably there are even more builds out there by the time you read this. It is rather unique.
Spoiler Warning
Warning: The final step in this Instructable contains spoilers on how to solve the puzzle. You can decide if you want to look or not! My guess is you will peek! ... eventually.
Supplies
- Computer
- Fusion 360
- A 3D printer
- PLA filament
- red
- blue
- yellow
- green
Step 1: 3D Files
impossible-piece.stl
Attached is the STL file for one puzzle piece.
- Download the STL
- Print four
- You can print all four pieces at the same time by importing it four times to your slicer application.
- You can print one at a time and change filament color between printings.
- Solve it!
- Challenge: can you do it without reading the spoiler step at the end of this Instructable!
- Take a peek at the spoilers, then solve it.
I use Ultimaker Cura slicer application but there are plenty of others available. There is nothing special about the print. No need for support. 20% infill is fine.
I have an Ender 3 pro printer. It takes me about 1.5 hours to print one piece or 6 hours to print the set of four pieces.
impossible-puzzle.f3d
Also attached is the Fusion 360 file. Go ahead and download and play while reading or watching the video. If you make changes, I'd love to hear about how you made it even better.


Step 2: Glossary of Terms
Here are some terms that may help while reading this Instructable:
- Sketch: A drawing in Fusion 360 to define shapes and other features. Nearly every Fusion 360 design starts with a sketch.
- Extrude: A Fusion 360 tool to create a body or multitude of other features from a sketch.
- Loft: More powerful than Extrude. Fill the space between two sketch profiles.
- Tab: The thing that sticks out from a jigsaw puzzle piece to join the neighbor.
- Blank: The hollow part of a jigsaw piece where the neighbor's tab fits into.
- Slicer: A computer program that reads a STL and builds a custom file that your 3D printer understands.
- Spoiler: I'll show you how to solve the puzzle at the end of this Instructable.
- Easter Egg: Programmers love to hide gems in non-obvious places. There is an easter egg spoiler at the 6:00 minute mark in my YouTube Video.
- Timeline: Fusion 360 has a history slider at the bottom of the project window. Move the slider to go back in history to insert changes.
- Coincident Constraint: Constrain two sketch features forcing them to align on top of the other. A couple of points can be forced to line up.
Step 3: Fusion 360 With Loft! (A Summary)


The Instructable takes you through the design using Fusion 360. I also made a video if you prefer to watch as I build it. Click the link above to watch. I runs slightly under 30 minutes (unless you pause and slow-mo for spoilers or other fun stuff).
[Note: on December 10 I posted a new high-resolution YouTube video. If you had trouble viewing previously, try the new link above. Same video, easier to watch!]
Here is a quick summary:
- Create a sketch
- 80x80mm square divided into four sections representing the four pieces.
- Create a 23mm circle and a rectangle for the tongue that holds the pieces together.
- Normally the next step would be to do an extrude. Nope! If you do a simple extrude, you will create a puzzle that your three-year-old niece or grandson or little friend would enjoy. Instead we are going to make a hard puzzle. We will not use Extrude. We will use Loft (basically a more powerful Extrude).
- The loft tool requires two sketches
- Create an offset plane 20mm above the plane of the first sketch
- Copy the first sketch
- Edit the first sketch
- Select all, using the window select
- copy
- Create a new sketch on the offset plane so it hovers 20mm above the existing sketch
- Paste the contents of the first sketch so now you have an exact duplicate.
- Resize the circle to 20mm. This step is most critical for creating a good puzzle. Make the circle smaller!
- Make sure the two sketches are lined up directly on top of each other. You will likely need to use the coincident constraint to line up the puzzle center with the origin.
Save only one of the bodies (just one piece) as a mesh to generate the STL file.
As-is, do not export the entire design as a STL. My implementation does not add any space on the flat areas between pieces so printing the solved puzzle will result in a puzzle that has the pieces fused together by heat. (Maybe you will want to modify my design slightly to add a faint gap so no piece touches any other piece at all.)
Another advantage of saving only one piece as mesh is you can print each separately, changing filament after each print for a spectrum of color.
Step 4: Create a Sketch


- Create a sketch
- 80x80mm square divided into four sections representing the four pieces.
- Create a 23mm circle
- Create a rectangle for the tongue (tab) that holds the pieces together.
- I picked 15mm as the length of my rectangle.
- Make sure one edge of the rectangle aligns with the edge of the piece
- Make sure both corners of the rectangle lie on the circle. I used the Coincident Constraint to force the intersection:
- Select Coincident Constraint from the Constraints menu.
- Click on the circle
- Click on the corner point that needs to be aligned.
- The corner of the rectangle will jump to the edge of the circle.
Step 5: Create Offset Plane

The Loft tool requires two sketches on two planes. So we will construct a horizontal plane 20mm above the plane of the first sketch.
- Pick Offset Plane from the Construct menu
- Select the XY plane or the plane defined by one of the sketch regions.
- Enter 20mm for the offset
- We now have a location to put our next sketch
Step 6: Copy Sketch to Offset Plane


- Copy the first sketch
- Edit the first sketch
- Select all (using the window select)
- Copy (Control-C on Windows or Command-C on the Mac)
- Click Finish Sketch (or Undo Edit Sketch since we didn't actually make any changes).
- Create a new sketch on the offset plane so it hovers 20mm above the existing sketch
- Create sketch.
- Select the new plane (which is 20mm above the original XY plane).
- Paste the contents of to first sketch so now you have an exact duplicate.
Step 7: Modify Second Sketch for Smaller Circle


- Resize the circle to 20mm. (You will recall that the original is 23mm.) This step is most critical for creating a good puzzle. Make the circle smaller!
- Make sure the two sketches are lined up directly on top of each other. You will likely need to use the Coincident Constraint to line up the puzzle center with the origin.
- Select Coincident Constraint from the Constraints menu (remember doing this before!)
- Click the center of the puzzle
- Click the XY origin (aka the center of the puzzle defined in the other sketch).
- The puzzle will jump to align with the original sketch.
Step 8: Create Piece Using Loft (not Extrude)


Loft is basically a powerful Extrude. It allows us to make the top of our puzzle piece with a different shape than the bottom.
Now that we have created two slightly different sketches we will fill the area between to make a new body. The base of the body is defined by one sketch. The top is defined by the other sketch. The puzzle piece will morph from one shape to the other. Because of our modifications to sketch 2, the tab therefor is a cone not a cylinder. The blank is also conical so they fit nicely one inside the other.
(As you probably have guessed: the tab is officially the name of the thing that sticks out, and the blank is the round part that it fits into. I didn't make it up!)
- Select Loft from the Create menu
- Hide the top sketch
- For Profile 1, select the four regions of the bottom sketch that define one puzzle piece
- Unhide the top sketch
- For Profile 2, select the same four regions as before, but select them from the top sketch.
- The defaults should be fine. There is no need to define rails.
- Click OK
- Done. You now have a puzzle piece!
Step 9: Circular Pattern Makes a Puzzle


This step is optional. There is no real need to generate all four pieces since they are all identical. But I found it easier to visualize if I can see the entire puzzle in solved position.
- Select the Pattern->Circular Pattern from the Create menu
- (If you selected Square Pattern, you can change the type to circular pattern by selecting the circular type in the popup.)
- Click on the puzzle piece to pick the object
- Select the vertical corner edge of your piece defined at the origin.
- Typically the default quantity is 3. Change it to four since we want four pieces.
- Click OK.
So we have a nice (tight) fully formed puzzle. Looking good!
Step 10: History Is Our Friend


After inspecting our puzzle we notice that the pieces are too snug. It is in fact so tight that it is completely unsolvable. So we need to go back and edit our piece.
Fusion 360 has a nice feature called the Timeline. Let's use that now.
Instead of deleting our circular pattern action, we can simply move the timeline slider to the left by one. Roll back the history to one single piece.
You will find the timeline all the way down at the bottom of the Fusion 360 window. We haven't completed very many operations so the end of the timeline is down near the left of your screen. Go ahead and move the slider left and right and watch your operations disappear and reappear.
For now, we just want to roll back our history by one item. Place it after the Loft operation and before the Pattern operation. Now only one piece is visible.
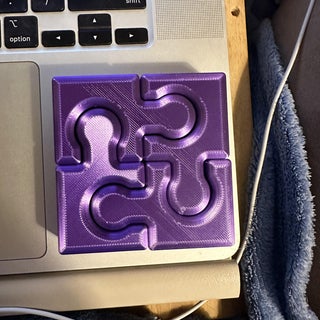
Step 11: Offset Face: We Need a Gap


To solve the puzzle we need to add some space between pieces. You can make the blank bigger or you can make the tab smaller. Either is fine. I chose to make the blank bigger.
After some experimentation I found that 0.75 millimeters is a good spacing. 0.5 mm is doable but you really need to apply a lot of force to solve the puzzle -- put it together. A 1.0mm gap is fine -- it is easy to solve if you know the trick -- but the solved puzzle felt too loose. So I like 0.75mm. (Actually -0.75mm here.)
This is accomplished by the Offset Face operation.
- Select Offset Face from the Modify menu.
- Pick the two inside flat faces.
- Pick the inside of the cone
- Set the distance to -0.75mm
If you did it right you now have a bigger hole. An adjacent piece will now slide in very easily with plenty of wobble.
A Harder Puzzle
If you want to challenge your friends and make the puzzle harder, consider making the gap as small as 0.5mm. But I wouldn't go any smaller than that. If you do change the gap I'd love to hear about it. Leave me a comment!
If You Want to Print in Solved Position
As implemented, this puzzle cannot be printed as a fully formed puzzle. As-is you need to print one piece at a time. If you decide you would like to print all four pieces in solved position you will need to add some gap on the flat areas that touch neighboring pieces. I did not do this so I can only guess the best distance. I'm thinking 0.1mm might be ok. Let me know. I love comments!
Step 12: Fillet All Edges


Rounded edges are great for several reasons:
- The finished product looks nice.
- It feels great. You just want to pick it up and feel it.
- But most importantly, a good rounded set of edges makes it easier to solve (again, if you know the secret!)
I put a good 2.0mm fillet all the way around. And I added a 5.0mm fillet where the neck of the tab meets the main body of the piece.
- Select Fillet from the Modify Menu
- Find all the outside edges and select every one of them. There should be 32 of them.
- Set the radius value to 2.0mm
If you missed a couple of edges and want to add more, there is a trick. You can set the radius to 0.00mm and all the edges can be edited again.
- Set radius to 0.00
- Click the forgotten edges
- Set the radius back to 2.0mm
Now do the same for the two inside edges at the neck. And the two corresponding outside edges of the blank (which I did not do in an earlier design but that's ok too!)
- Select Fillet from the Modify Menu
- Click the four edges.
- set the radius to 5.0mm
Step 13: History Is Our Friend. for Real!


Remember when we used to have four pieces in our puzzle (rather sharp and tight). But now we have only one (nice and smooth). Well let's go back and retrieve the missing three. Simple. Just roll the timeline back to the end.
- Grab the little triangle marker way down at the bottom of your window.
- Slide it all the way to the right.
- Voila! Three missing pieces appear by magic.
Step 14: Save As Mesh


There is no need to save all four pieces since they are all identical. You really just want to save only one piece.
Important! Do not export the entire puzzle as a STL. Because I did not insert any gap on the flat between pieces, they will fuse together if you 3D print all four in solved position. If you want your printer to generate a solved puzzle, you will need to go back and add some minimal Offset on the two flat faces that adjoin with the neighbor piece.
- Right-click on any piece body in the list on the left to get a menu.
- Select Save as Mesh.
- The file type should be STL.
- Enter some name for your piece. Like maybe impossible-piece.stl
- Click OK.
Yay! Now we are done! All you need to do is print and enjoy!
Step 15: Spoiler Alert!

The step after this one contains spoilers. Don't peek!
Step 16: Spoilers!


WARNING WARNING WARNING
Spoilers. This is how you solve the puzzle.
- Get ready:
- Connect two pieces
- Connect the other two pieces.
- Press the tabs as far into the blanks as they can go. It should be a nice snug fit.
- Hold the sections so the cones are pointing down -- the narrower face of each tab is down.
- Get cross:
- Rotate the right side clockwise a bit
- Rotate the left section counter clockwise a bit
- Close the gap
- Hover the far tab in your right hand over the blank in your left hand
- Hover the near tab in your left hand over the blank in your right hand
- It should now be criss-crossed so both tabs hover over both blanks.
- Now twist them into place so each tab inserts into its fellow blank.
- If you did it right, the puzzle should line up and fall right into place.
- Bingo! Solved!
The pictures should explain it. And I've attached a quick 10 second movie if you want to download and watch the motion.
Also, if you want to be cool:
- Open the YouTube video linked from this Instructable.
- Find the 6:00 minute mark
- Pause there.
- Slow down the video to 0.25
- Find the Settings at the bottom of the YouTube window
- Set playback speed to 0.25.
- Unpause
- Watch the black gloves solve it right there in front of your eyes!


Judges Prize in the
Puzzles Challenge


29 Comments
5 months ago
Important note. I made an update to the Instructable this morning:
I posted a new high-resolution YouTube video. If you had trouble seeing the details in the original video, try the new one. It's the same half-hour video but easier to watch!
5 months ago
I loaded the STL into Cura at 50% size, printed out 4 pieces and cleaned them up. Then I attempted to solve. I built a "stairway" of 3 pieces (linked of course) and managed to rotate the remaining one into place. Coming back to find the spoiler I know that my solution is much harder to accomplish - maybe if the tolerances had been a little tighter I'd not have been able to do that. Thank you. When I get a moment I'll have an attempt at building this with FreeCad.
Reply 5 months ago
Good to know. Yeah, a half-size version 20x20mm would be a great adaptation. Love to hear what you come up with for optimum spacing on that. The less space the harder it gets.
Reply 5 months ago
I mean 40x40 half size (20x20 each piece) would be great.
5 months ago
great puzzle, great project.
thanks
Reply 5 months ago
Enjoy!
5 months ago
Just looking at it, I would try to start one of the up and another down place the forth underneath the three and push down.
Reply 5 months ago
Maybe! :)
5 months ago on Step 16
Just printing my third one off.
Perfect Christmas stocking filler.
Reply 5 months ago
I'm currently doing the same. Everyone is getting one of these and one of the pocket catapults with a small bag of airsoft pellets. It's going to be a 3D printer Christmas.
Reply 5 months ago
I did an all-3d-print (well, mostly-all) Christmas a couple of years ago. Catapults and launchers were a great hit!
Reply 5 months ago
Nice! Send me a note after Christmas on how everyone liked it.
5 months ago
This is neat! Thanks for sharing :D
Reply 5 months ago
This one was fun. Thanks!
5 months ago
Brilliant puzzle! I love this - very nicely done!
Reply 5 months ago
Thanks! That's a nice compliment. After looking at all the cool Instructables that you created in the past, I appreciate the complement. It means a lot.
5 months ago
Great project and great Instructable! I've tried using Fusion 360 and have been a bit intimidated by it. This really helped.
Reply 5 months ago
Great! Yeah Fusion 360 is so powerful with all it's buttons, it can sometimes be hard to decide how to get started. I'm glad this helped.
5 months ago
Love this, as someone new to 3D printing the software was way over my head however you can be sure I dl the STL I cant wait to put this on the table so the snarky kids can be baited in. If not in the #d contest it should be!!
Reply 5 months ago
Awesome. Let me know what the kids think about it when you give it to them as a challenge.
And, yeah, it is entered in the puzzles contest. Seems appropriate.